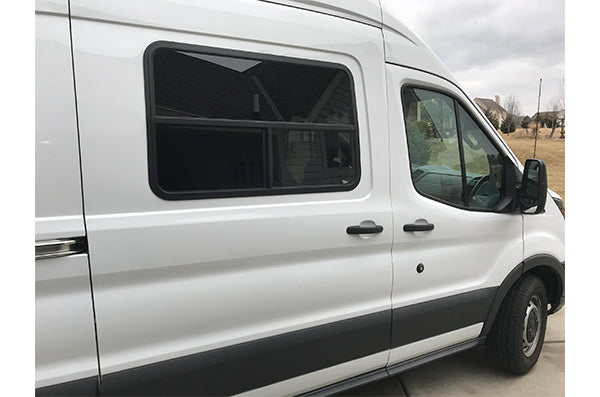
Installing a window in the passenger side sliding door of the van was in our plans for the conversion since the beginning. The window will allow for great airflow while running the Maxxair fan as well as provide much needed light in the van. When choosing your aftermarket window, there are really only two top options: C.R. Laurence (OEM factory style window) or Motion Window (Med-High Transit - 1). We selected the Motion Windows because we liked the slightly smaller look, the T style lower sliding screen and the price. The Motion Window invoice with shipping was $460 vs the C.R. Laurence at $800. The Motion Windows are made to order in Vancover, WA and take roughly 3 months from the time the order is placed to the time of delivery, so plan ahead.
Clutch Resources:
Motion Windows installation video (middle of the page)
Tools & Hardware
Jigsaw with a fine metal blade -amazon.com
Angle grinder with a thin metal cutting wheel
Cordless drill
3/32 drill bit
6' Ladder -amazon.com
Wet / Dry Vac -amazon.com
Metal file -amazon.com
Window Cleaner
Lacquer Thinner
Paint (either OEM or Rustoleum)
Rag
Blue painters tape -amazon.com
45"x30" piece of cardboard (used for template)
Towel / Blanket (to catch metal filings)
Radius template - print from motion windows
The Install
Before we begin detailing the install, we must say that the installation video noted above is extremely helpful. We will call out a few things that were not overt in the video that would have helped us throughout this install.
The first step in the process is to create a cardboard template using the beauty clamp ring of the window. We did not have any cardboard this big, so used an excess piece of Rmax foam insulation. The beauty clamp ring will come attached to the window with a few screws that will need to be removed to separate the clamp from the window. NOT IN VIDEO - Pay close attention to the track / channel in the window that these screws are placed in, as understanding this will be a big help towards the end of the install. NOT IN VIDEO - When tracing the beauty clamp ring, trace the outside edge vs the inside. Note on the template which side is front and back as well as up and down. This will eliminate any uncertainty when you bring the template out to the van.

The next step is to shorten the passenger door locking plunger (if needed) NOT IN VIDEO. We used the angle grinder to remove about an inch and eliminate any interference with the window.

With the locking plunger out of the way, it's now time to trace the template on the inside of the passenger side door. Use a ruler to make sure the template is lined up evenly. Then, take a thin sharpie marker to trace the outline of your template onto the interior of the passenger side sliding door.


The next step is to drill two holes in each corner that will allow you to mirror the template outline on the exterior of the door. NOT IN VIDEO - Use the radius template to determine the hole location based on where the corner meets the straight line of the template trace. This will make the drawing of your corners easier and more accurate on the exterior side of the door.
With the holes drilled, move to the exterior side of the door and cover the rough cutting area with the blue painters tape. The tape should cover the holes, but will still be visible for when you start tracing. With the tape in place, trace a straight line from each hole to outline the top, bottom and sides of the window. Use the radius template to complete each corner. Hang a towel from the interior, covering the cutting area to keep metal burrs from going all over the inside of the van. The prep work is complete and it's now time to cut a huge hole in your perfectly good van!

Using the angle grinder, create a starter cut in the bottom left and right sides of the outline. This step will allow you to easily begin cutting with the jigsaw. Cut from the bottom to the top on each side as shown clearly in the video. Be very careful at the end as the metal can shake and the edges are razor sharp. With the window opening complete, use a metal file to remove any burrs and smooth down the edges of the opening.


NOT IN VIDEO - Before applying the weather stripping tape to the window, insert the beauty clamp into the opening and place the window into the hole to ensure the window fits. Now that you've confirmed the opening is the proper size, paint the exposed edges from the cut to prevent any future rust or corrosion.
Insert the the beauty clamp back into position from the interior side of the door. The two pieces of the clamp should just be resting on themselves for now.
Finally, we get to work with the actual window! Clean the window flange with the lacquer thinner and starting at the bottom apply the weather stripping tape, overlapping the ends by 1/2 inch.

Prep the exterior of the van by generously spraying window cleaner where the window will be placed. With someone on the inside of the van to help, place the window into position. From the exterior, measure the left and right sides at the top of the window to ensure they are even and make any small necessary adjustments. Have someone press against the outside of the window while you use the provided screws to attach the window and the beauty clamp. Remember back to the very beginning, the screws should sit in the track / channel of the window.

There you have it. Your new window is installed and ready to be enjoyed!
5 comments
Larry McMahon
Jonathan,
I’m not sure how much it would have cost to have a shop do the window as we did all the work ourselves. The team at www.motionwindows.com maybe able to give you a ballpark estimate.
Jonathan,
I’m not sure how much it would have cost to have a shop do the window as we did all the work ourselves. The team at www.motionwindows.com maybe able to give you a ballpark estimate.
Jonathan Aldridge
How much it cost to get a shop to cut and install side window transit van
How much it cost to get a shop to cut and install side window transit van
Larry McMahon
Lindsey,
We did not use any caulk post installation.
So far the window has been holding up great!
We’re really happy with the product and it provides a much needed cross breeze
when we have the maxxair fan going.
Lindsey,
We did not use any caulk post installation.
So far the window has been holding up great!
We’re really happy with the product and it provides a much needed cross breeze
when we have the maxxair fan going.
Lindsey
Thank you so much for explaining the gaps in the instructions provided by Motion Windows! Did you use an acrylic latex caulk with silicone to finish the installation? Or did you just leave it as is? How has your window been holding up?
Thank you so much for explaining the gaps in the instructions provided by Motion Windows! Did you use an acrylic latex caulk with silicone to finish the installation? Or did you just leave it as is? How has your window been holding up?
Sarah horndog
Good bed time reading, great van!
Good bed time reading, great van!