**Please Note: This post is a work in progress!
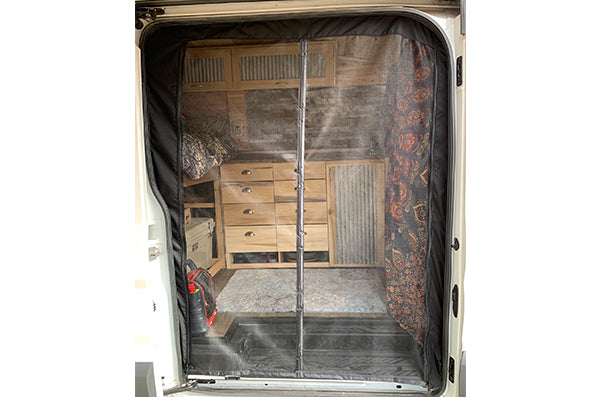
There have been a lot of questions recently about our Magnetic Screen Door / Bug Net. We actually made this custom magnetic screen door for our Ford Transit Van rather than purchasing one. Reasoning being twofold: 1) the nets we found online were EXPENSIVE; 2) we didn't know what the quality would be for the price.
From our first trip in our converted Ford Transit Van, we knew we needed a solution to the constant opening/closing of the sliding door. There's always something we forgot inside or needed to quickly grab. Not only is the sliding door loud, but it let ALL the bugs inside! To avoid both of these things, we decided to design a magnetic screen door.

We chose to make it detachable, so we could remove the entire screen when needed. We also added zippers on both sides so if we didn't want to fully remove it, we could roll it up and secure it overhead. The middle magnets are strong and hold closed with the exception of very strong wind directed at the door (however, this has never been an issue).
We are still in the process of writing out the specs and details on how to make one yourself. In the meantime, here is the list of items used and a very short description of each:
MATERIALS
72"x80" Magnetic Screen Door - amazon.com
#10 Zipper Coil Chain and Sliders - amazon.com
Heavy Duty Nylon Thread - amazon.com
Black 500d Nylon Cordura fabric - ebay.com (1 60"x36" piece)
Sewing Machine (we use the Brother XR6060) -amazon.com
90/14 or 110/18 Sewing Needles (we used 90/14 and it worked great with our machine)
Before we get to the design, here are some details:
- We chose the above Magnetic Screen Door on amazon.com because it was super heavy duty: anti-tear, stronger magnets, smaller mesh holes AND it comes with velcro which we repurposed to attached it to the van
- The Zipper Coil is amazing and easy to put together. It is definitely big and beefy- so be aware that this isn't your basic jacket zipper pull! We wanted it to be large and heavy duty to ensure it didn't easily break over time
- This Nylon Thread is great, but you may be able to find a smaller roll of thread at a local art supply store (unless you'll plan to use it for future projects too)
- There are various types of black fabric out there; we chose Cordura as it is water resistant and super durable
Here's what we did:
- Start by measuring the width and height of your door (some vans, like our Ford Transit van have a section that gets narrower so make sure to document both the widest and narrowest sections)
- Width should be from metal edge to metal edge left to right
- Height will be from the start of the metal on the inside of the van (above the rubber door frame) to just below the steps
- Mesh Screen Door:
- Cut off the velcro lining and save for later
- Cut the length, if needed, so you have an extra couple of inches on the top and bottom
- Cut the width so that the mesh is 2-inches shorter than the width of the door on each side
- Cordura Fabric
- Cut one 6-inch wide pieces that is 4-inches + the height of your door
- Cut one 8-inch wide pieces that is 4-inches + the height of your door (if one side of your van has an angled section like our Transit; otherwise, cut two 6-in wide pieces)
- Cut one 6-inch wide piece that is the width of the van
- You will start by sewing these three pieces together to make an upside down U. Bring inside the van and hold it up in the door to adjust the width so that about 4-inches of cordura from the outside
- The upside down U, when held up will be longer than needed and you can adjust later
- Measure the height dimensions you want your door to be, taking note that you want about 3-inches of cordura visible and another 1.5 inches of cordura for sewing on the velcro. Best way we found was to hold up the cordura with magnets where we wanted it and use measuring tape to get the right height
- Cut the cordura bottom about an inch longer than you want it to end up
- Zipper
- Fold about a half inch of the inside edge of cordura fabric and sew on the zipper. Do this on both sides, makeing sure the zipper stops about an inch before the bottom of the cordura
- Mesh Door again
- Lay the cordura/zipper upside down U on the floor and then lay the mesh door inside of it. Fold the mesh so it fits within the width and height of the U (ensure the bottom is the same length as the bottom of the zippers)
- Then, fold and carefully pin each side so you can sew it to the zippers
- Be careful not to pull too tight on the width or the magnets will pull apart when it's in the door. You want it tight, but not pulling
- Once the mesh is attached, you now have your door.
- Clean and dry the inside door where you'll be attaching the adhesive velcro. Then, attach the velcro across the top and sides of the doorway (we attached ours along the very edges of the doorway, just where the metal starts. Press down firmly and give it about 20 minutes to stick
- Now, take your mesh door piece and hold it up inside the door with magnets or clips and using a marker or chalk, mark the cordura along the inside edge of where the velcro will attach. We wanted our velcro on the outside of the mesh door, but depending how you want it to hang, it can go on either side (just make sure you attach it all on the front or back
- We recommend doing one side at a time and going back to the van to test it to make sure it's sewn in the right place. Once you have it all sewn and adjusted ( again, make sure it doesn't velro on too tight or the screen magnets will be pulled apart)
- You will then cut off any excess cordura from the sides and you can finish the bottom cordura by folding over and sewing
Ford Transit High Roof Dimensions (for side sliding door):
- We cut our cordura fabric into 3 pieces:
- 56"x 6" (for width of doorframe)
- 74"x6" (for the right/flat side)
- 74"x8" (for the left side that has a section that's wider/narrower)
- Mesh was cut so that each half (magnet to edge) was 24", which left a little extra to fold the edges for a nicer look
- Mesh height was cut to 70" to start and was adjusted slightly in the end to rest against the bottom edge of the steps (we could have left ours a little longer)
This is how we made our screen magnetic door. There are plenty of other ways to do it. Such as- if you don't want the zippers, you can skip that part or you can even skip the cordura. We wanted the edges sturdy which is why we did cordura. We also like the zippers so if we don't want to take the whole thing down we can just roll it up and secure it at the top.


10 comments
Michelle Matthews
This tutorial was excellent. We made a couple of tweaks for our Transit ((1) our zipper wraps around the top, so the whole screen can be zipped away to the side rather than the top; and (2) we have a slightly narrower cordura buffer all the way around). It has worked well, and it’s also holding up well.
This tutorial was excellent. We made a couple of tweaks for our Transit ((1) our zipper wraps around the top, so the whole screen can be zipped away to the side rather than the top; and (2) we have a slightly narrower cordura buffer all the way around). It has worked well, and it’s also holding up well.
Amanda McMahon
Libby,
Thanks for the kind words, we LOVE the screen door as well!
The only change we would make would maybe changing the position of the zippers from going vertically to horizontally away from the magnetic closure. This would allow you to roll the screen to the side vs to the top. When the screen is rolled up, it brushes the top of our heads when we go in and out of the van. Other than that, we wouldn’t change a thing!
Amanda
Libby
Hello. I love your screen door and am going to try to replicate it for our Transit van. I have purchased the materials but haven’t actually cut anything yet. Before I dive in, would you make any modifications or change any recommendations from your post last year? It’s a really clever design! Thanks.
Libby
Larry
Yvonne & Colleen,
The way we designed our screen door, I can’t think of a way that I would feel comfortable saying it would be secure enough to keep a cat inside. One thing to consider would be using something more secure than magnets on the front of the screen door such as a zipper. As far as the bottom of the screen door, I would explore options to secure it to the van body. A few things that come to mind are snaps or super heavy duty magnets…it all sort of depends on how curious your cat is ! Hope this helps!
Larry
Colleen
I’m also traveling with my cats! Same question regarding the security of the bottom!
I’m also traveling with my cats! Same question regarding the security of the bottom!
Yvonne
I’m wondering if there is a way that the bottom of the screen door can be held in place strongly enough to prevent a cat from escaping? We want to travel with our cat while ensuring her safety. Thanks!!
I’m wondering if there is a way that the bottom of the screen door can be held in place strongly enough to prevent a cat from escaping? We want to travel with our cat while ensuring her safety. Thanks!!
Amanda McMahon
Hi Serge- Thanks for the note. We are not making screen bug doors right now, but may start selling them in the near future. If you can send us an email at support@seekdrygoods.com with your info and email address, we’ll let you know when we are starting production.
Hi Serge- Thanks for the note. We are not making screen bug doors right now, but may start selling them in the near future. If you can send us an email at support@seekdrygoods.com with your info and email address, we’ll let you know when we are starting production.
Serge Huard
I need for a ford transit 2016, 2500, long and hight
2 bugs screen:One for rear doors
One for sliding door
I need for a ford transit 2016, 2500, long and hight
2 bugs screen:One for rear doors
One for sliding door
Larry McMahon
David,
Congrats on the van purchase!
We attached the screen door to the van using the Velcro that came with the magnetic screen door listed in the post. We will have a more detailed post on this after the holidays. Hope this helps!
Larry
David,
Congrats on the van purchase!
We attached the screen door to the van using the Velcro that came with the magnetic screen door listed in the post. We will have a more detailed post on this after the holidays. Hope this helps!
Larry
David Colborn
Just bought a 2016 Transit Van. Reading your article on the bug screen, I wondered how you attached the sides and top to the opening.
Just bought a 2016 Transit Van. Reading your article on the bug screen, I wondered how you attached the sides and top to the opening.