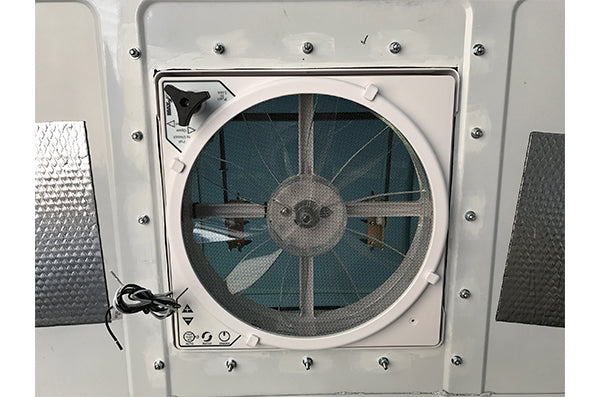
The first step in installing a fan, is choosing the fan that works best for your needs and your budget. We chose the Maxxair 6200 in Smoke (click for manufacturers details). We chose the Maxxair over the Fantastic fan for one key reason: The Maxxair fan can be open while driving as well as when it is raining. Key Tip: The smoke color is semi transparent, which acts as a slight skylight vs. the white which is solid and does not allow light to penetrate.
Clutch Resources:
Moreysintransit - Fan Install
Far Out Ride - Fan Install
Home Sweet Van - Fan Install
Tools & Hardware
Jigsaw with a metal blade -amazon.comCordless drill with a full set of drill bits
Wet/Dry vac -amazon.com
Plastic drop cloth -amazon.com
Plastic tarp -amazon.com
4 C clamps
Metal File -amazon.com
Rustoleum white paint -amazon.com
Small foam paint brush -amazon.com
220 grit sandpaper
Painters tape
Tape measure
Metal punch
Screw drivers
Acetone
Isopropyl alcohol
Gloves, mask, hat
Maxxair 6200 smoke -amazon.com
Outside roof vent adapter -ebay.com
Butyl seal tape 1 1/8" x 3/4" x 30' -amazon.com
3M 4200 marine adhesive -amazon.com
Dicor lap sealant -amazon.com
16x #10 x 24 1 1/4" round top machine screws -amazon.com
32x #10 washers
16x #10 nuts with nylon insert (the nylon will keep the nuts from loosening with the vibration of the van while driving) -amazon.com
The Install
Prep: We laid a blue plastic tarp on the floor of the van and hung a disposable plastic drop cloth (secured with painters tape) covering the front of the van to protect it from metal shavings.
The first thing we did was identify exactly where in the van we wanted the fan to be located. We chose to place the fan centered in the first flat section of the roof away from the front of the van. This position would maximize ventilation when cooking as well as minimize noise while we were sleeping.
We then used painters tape to mark off a square on the inside of the van, roughly where we would be cutting the hole for the fan. Our next step was to measure a centered 14"x14" square and pencil that on top of the painters tape. None of the edges of your penciled square should be touching the raised ribs on the ceiling. Next we placed a line of painters tape directly down the center of the square (running front to back of the van) and made a mark at 7". We used our cordless drill and a 3/8" bit to drill a hole from the inside of the van right on that 7" mark. Now we know exactly where the center of the van opening should be when we get on the roof and start the real work! Key Tip: measure, re-measure, then measure once more! Once that hole is made, there's no going back... so you want to make sure you are making it in the right location.

Take to the roof! Make sure to only put your weight over the crossbeams that run from left to right of the van. We marked them with painters tape based on a great suggestion from Home Sweet Van.
We located the hole previously drilled at the 7" mark from the inside of the van and measured 7" out from the hole in each direction and marked those spots. Next we placed painters tape in a square, covering these marks, to roughly identify where we would be cutting. We then placed the adapter on the roof ribs with the hole directly in the center of the adapter and traced the interior of the adapter onto the painters tape. We now have a perfectly centered 14"x14" square!

Our next step was to drill holes in the corners of the square to both start the jigsaw as well as make the turns easier. We started with a 1/8" drill bit then moved right up to a 3/8". Key Tip: You want the corner holes to touch the corners of the square. You are now ready to cut a big hole in your perfectly fine van! When cutting the hole, we had best results keeping the saw blade on high, but slowly moving the saw across the lines. Stop after cutting each side and duct tape 2-3 spots on both the top and bottom of the side you just cut to ensure the metal doesn't move during the next cut.

From the top of the van, vacuum as many of the metal shavings as you can see. These small pieces of metal can cause major rust issues down the road if left alone. The next step is to use sandpaper and a metal file to smooth down the edges of the fan opening. We did not drill our corners close enough, so needed to use a dremel tool to smooth some bigger metal burs in the corners. Once the fan opening is smooth, we used white Rustoleum paint to cover the now exposed edges.

Time to get back on the roof! We lined up the adapter over our fresh hole in the roof and set the fan flange (piece of the fan that sits on top of the adapter) in place. IMPORTANT - the metal clips on the fan flange must be facing the sides of the van, not front to back. We then set the fan unit in place to ensure everything we've done to this point has been correct. Fits like a glove! We took the fan unit out and placed aside for now.
Still on the roof, with the adapter and flange in place, we drilled pilot holes in the 16 locations around the perimeter of the fan flange. We sanded and filed the holes, vacuumed the metal shavings and painted with Rustoleum on both the top and bottom.
Back on the ground, we cleaned the fan flange with isopropyl alcohol (directions say to not use acetone) and laid a single strip of the butyl tape. Key Tip: Do not overlap the butyl tape; the ends of each side should lay flush with each other. We drilled a hole through the butyl tape in each of the four corners so we could line up the screws once we got back on the roof.
On the roof, we applied about a 1/8" bead of 3M 4200 adhesive all the way around the bottom of the adapter. Key Tip: The difference between 3M 4200 and 5200 is the adhesion strength. The 3M 4200 is designed to be removable while 5200 is permanent. Click here for the 3M specs. We used 4 C-Clamps to hold the adapter and flange in place while we placed the 16 screws. We used washers on both sides of the screws as well as nyloc nuts to ensure nothing came loose with the road vibrations from the van.
After letting the adapter and flange set for a few hours, we returned to the roof and placed the fan unit on the flange. Remember to have the fan completely open before setting the unit into the flange. We initially had trouble lining up the four screws on the sides of the fan with the metal clips on the flange. We used a flat head screw driver and hammer to slightly move the metal clips upwards on the flange and the screws then set perfectly.

The last step in the process was to put a thick bead of Dicor lap sealant along the contact point of the adapter and the van roof. This ensures no water can get into the unit.
And there you have it...the first step of our van conversion complete !
As an Amazon Associate I earn from qualifying purchases.
2 comments
Larry McMahon
Steve,
The Maxx-Air fan is great, but you are certainly going to want to another venting option to allow air flow throughout the van. We installed a passenger side sliding door window which we’ve been really pleased with. (https://seekdrygoods.com/blogs/van-life/ford-transit-van-conversion-window-installation) Adding a second fan is certainly an option, but I think it may be a bit overkill in the 148wb. There is also an option to add a smaller window in the rear of the van which depending on your setup could help add ventilation in the bed area. Motion windows has an excellent option for this window. (https://www.motionwindows.com/ford-transit-van-aftermarket-conversion-windows/). Let us know how it goes and what you end up doing.
Steve McElwee
I have a Ford Transit 148wb and will be installing a Maxx-Air fan. My van has no opening windows other than front doors. Does the one Maxx-Air fan move enough air to keep things comfortable inside while camping? Would you think two fans would be better?
I have a Ford Transit 148wb and will be installing a Maxx-Air fan. My van has no opening windows other than front doors. Does the one Maxx-Air fan move enough air to keep things comfortable inside while camping? Would you think two fans would be better?