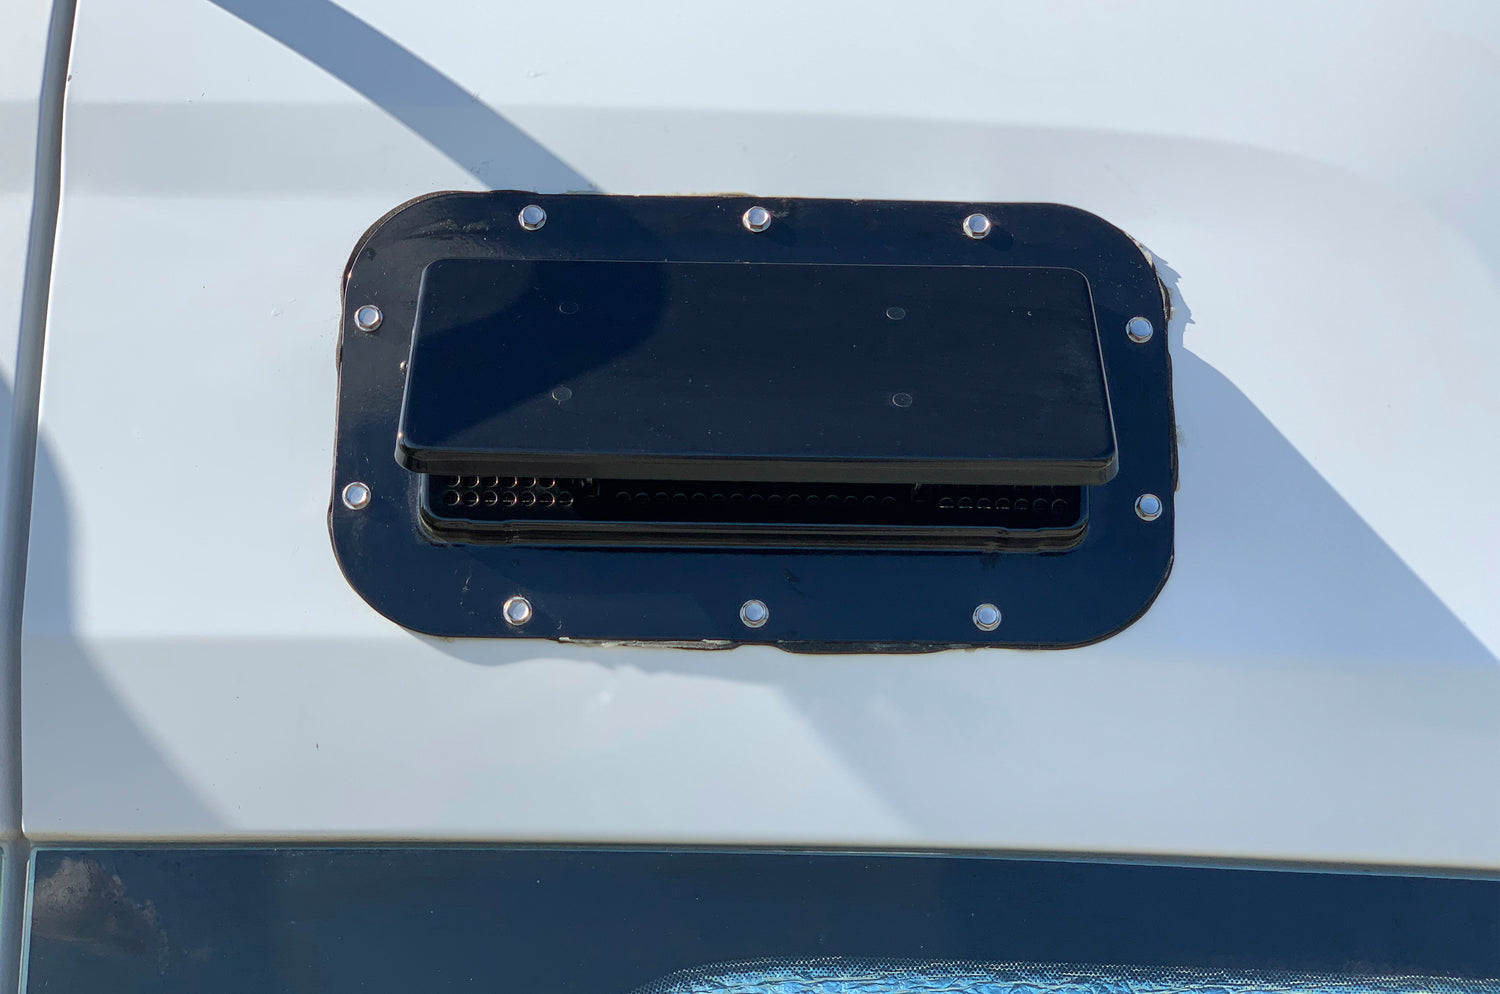
Summer is an amazing time to get out and put some miles on the van, but we learned quickly that getting air flow to the rear bed area of the van was crucial on warmer nights. Our Maxxair fan is located in the center / front of the van with our only other vent being the window slider on our passenger side sliding door. This design left the rear of the van stuffy and a warmer than we liked when the temperatures started to rise. After significant online searching, we found a vent that fit the flat space above the window of our passenger side rear door.
Tools & Hardware
Black aluminum low profile vent - amazon.comJigsaw -amazon.com
Milwaukee Tool drill and impact driver - amazon.com
Bosch 12" drill bit - amazon.com
Bosch 5.25" metal jigsaw blade - amazon.com
Wet/Dry vac -amazon.com
Plastic drop cloth -amazon.com
Metal File -amazon.com
Rustoleum white paint -amazon.com
Small foam paint brush -amazon.com
Silicon - amazon.com
Painters tape
Tape measure
Acetone
The Install
The install of this rear door vent was very straight forward and only took about 2 hours.

The vent comes with a paper template to trace the hole that is required to cut. When selecting the exact location for this vent, you want to ensure the gasket (included with the vent) sits as flush as possible against the van. The tops of the rear doors on the Transit are anything but flat, but the dimensions of this vent fit perfectly on the roughly 6.5" flat section of the door. Another thing to keep in mind is top closure latch on the rear door. Ensure that the vent is far enough away from the latch to not interfere with the normal operation of the door. Once we had the exact location selected, we taped the paper template down to the rear door and used a sharpie trace the cut line.

The section of the rear door we needed to cut consisted of a single panel of metal, about a 5" gap and then another panel of metal. In an effort to only require a single cut, purchased a long drill bit and drilled a hole through both sheets of metal on the inside of the bottom right section of our traced cutting area. We then used a thicker drill bit to enlarge the hole to fit our jigsaw blade. We did buy an extra long jigsaw blade for this job as the ones we had were not long enough to span the gap between the metal. With the starter hole drilled, we began cutting out our traced area, using blue painters tape to as we went to keep the cut metal from flapping around. We then used a file to remove any burrs, painted the cut edge to prevent any rust in the future and cleaned the surrounding surface with acetone.

Prior to installing the vent, we covered the small holes with leftover bug screen from our sliding side door project and secured with gorilla glue. This ensured that no little critters would fly or crawl through the open vent.

The vent comes with a gasket which we put a thin bead of silicon on both sides and secured the vent in place with self tapping screws.

*Quick disclaimer- while the links above are products we do honestly use and love, we are Amazon Associates and earn from qualifying purchases.


9 comments
Ian
Thanks for laying this out! I’m thinking of doing this to my transit as well. I have the same question as Wade: what did you do to bridge the gap between the outer and inner sheet metal of the rear door? Could we possibly see a picture of the vent from the inside?
Thanks for laying this out! I’m thinking of doing this to my transit as well. I have the same question as Wade: what did you do to bridge the gap between the outer and inner sheet metal of the rear door? Could we possibly see a picture of the vent from the inside?
Seek Dry Goods
Hi Skylar,
Thanks for your feedback! We love the vent for the added airflow. I will say that ours is pretty easy to open/close. The piece you grip to move it has a sort of handle/clasp that squeezes together to make it move (you can sort of see it in the 2nd to last photo). Maybe a little grease on yours will help? Or hopefully it will loosen a bit over time! Best of luck!!
Skylar
Awesome install—I was hesitant about installing mine in that area given the gap between the van panels but you’ve blazed the trail!
How difficult is your vent to open? I purchased a similar model from etrailer (https://www.etrailer.com/RV-Vents-and-Fans/Redline/9106.html) but it requires a large amount of force to open the vent, enough that I’m worried about bending the thin van sheet…
Wade Harbin
Glad to see this is possible,. It’s what I’m planning to do for my new Transit. It appears there is a fairly large gap (maybe 2"?) between the inner and outer part of the door sheet metal here. What did you do to bridge that gap?
Glad to see this is possible,. It’s what I’m planning to do for my new Transit. It appears there is a fairly large gap (maybe 2"?) between the inner and outer part of the door sheet metal here. What did you do to bridge that gap?
Kelly Armstrong
Thank you very much!
Thank you very much!
Larry McMahon
Kelly,
Sorry for that, the seller must have run out of stock.
I did some digging and the link below seems to be a very similar version on ebay.
Hope this helps!
Larry
https://www.ebay.com/i/113371371546?chn=ps&norover=1&mkevt=1&mkrid=711-117182-37290-0&mkcid=2&itemid=113371371546&targetid=935065065987&device=c&mktype=pla&googleloc=9028836&poi=&campaignid=10460085495&mkgroupid=109413763331&rlsatarget=aud-649939740844:pla-935065065987&abcId=2145999&merchantid=119018409&gclid=CjwKCAjwps75BRAcEiwAEiACMSS35zuJBiZ7x5Z0W7lD1H2276JxLuF55okp71PHE_Usp3IPiE99QBoCojQQAvD_BwE
Kelly Armstrong
The link to the vent on amazon doesn’t work. Do you know where else to find one like this?
The link to the vent on amazon doesn’t work. Do you know where else to find one like this?
Larry McMahon
Michael,
We love the placement. When you have your roof fan on exhaust it pulls the cool night air right over you…amazing! Best of luck with the install, I’m confident you are going to love it!
Larry
Michael,
We love the placement. When you have your roof fan on exhaust it pulls the cool night air right over you…amazing! Best of luck with the install, I’m confident you are going to love it!
Larry
Michael Langer
About to install this on my van, are you guys still enjoying it? Placement works?
Thank You!
About to install this on my van, are you guys still enjoying it? Placement works?
Thank You!