Up to this point, we had done everything in the build ourselves. For the next few steps of the build (ceiling, walls and cabinets) we called in our talented buddy Brian to lend a hand and leverage his expertise in making cool stuff!
Before embarking on the installation of the ceiling and wall panels, some prep work and planning is required. First, ensure all wires are run to their end point destination. Once this stage of the build is complete, it will be very difficult to cleanly route wires around the van.
Clutch Resources:
Tools / Hardware:
Cedar Planks - menards.com
Acegoo recessed 12v LED lights - amazon.com
12v dual zone dimmer - superbrightleds.com
Blue Sea USB outlet (2)- amazon.com
Single gang electrical box (for dimmer)
1" Furring Strips
1"x3" select pine stock
1"x2" select pine stock
Random selection of screws
3M Hi-Strength 90 spray adhesive - amazon.com
Liquid Nails - amazon.com
Caulk Gun - amazon.com
Nail Gun & 16 / 18 GA pin nails
Vibratory Saw
Mitre Saw - amazon.com
Hole Saw - amazon.com
Table Saw
The Install:
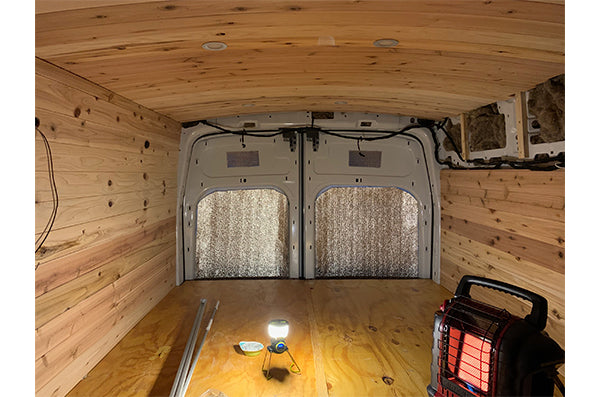
As far as planning goes, you will want to decide how you’d like your ceiling and wall panels to be laid out. This decision will determine how you layout the furring strips in which the panels will attach. We choose to run our ceiling panels from left to right, to better show the curvature of the ceiling and our walls front to back.
We started this phase of the build by securing 1” furring strips to the horizontal ribs on the ceiling of the van with 1 5/8” self tapping screws and liquid nails.

We then adhered our 3” batt natural sheeps wool insulation (see choosing insulation post) to the entire ceiling using 3M 90 adhesive.

With the insulation secure, we continued to add furring strips throughout the ceiling to ensure we had enough contact points to secure the cedar plank ceiling when the time came.

With the ceiling furred out, we proceeded to frame out the walls in a similar fashion, but with a mix of furring strips and 1x3 pine boards. There are a few places namely above the sliding door in which Ford uses re-enforced steel and we could not get a screw seated. In these cases, we had to get creative securing the wood frame to itself and being a bit heavy handed with the liquid nails.

The furring / frame out process took us roughly 20 hours and was certainly the most challenging step of this section of the build.

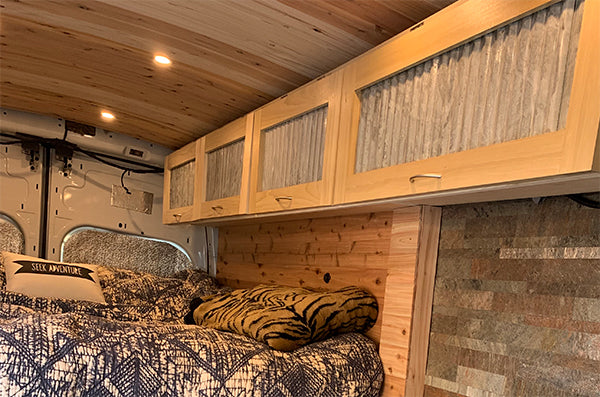
With the furring / fame out complete, we were now ready to begin the install of our cedar planks. We chose a tongue and groove cedar wall planking from our local hardware store which measured 5/16” x 3-9/16” x 8’. The 5/16” thickness allow us to bend the boards as we needed and the Cedar is great for a van environment because it is naturally resistant to insects and mildew.

We started with the rear passenger side wall as it was very straight forward and would be a good place to learn how best to work with the panels. To secure our cedar planks, we used liquid nails and a nail gun with a mix of 16ga and 18ga pin nails. TIP: Only nail the bottom side of the cedar plank your installing as it’s much easier to set the tongue and groove with the top of the lower board unsecured. Once the next board is set in place, nail the top of the previous board and the bottom of the current board.
As we installed the cedar, we cut out areas where necessary for electrical switches, outlets, lights, etc. For lighting in the van, we really liked the system used by Far Out Ride, so why re-invent the wheel?! We used 4 Acegoo LED’s in the back and 4 in the front on a 2 zone 12v dimmer. We also installed 2 Blue Sea USB outlets on each side of the bed for his & hers chargers.

We completed about 90% of the passenger side wall and then began working on the ceiling. This would allow us to run the ceiling boards to the edge of the van and then complete the wall to hide the ends of the ceiling boards.

Once we got to the front of the van, we cut back the visor a little and tucked it up and under our last piece of cedar.

With the ceiling complete, we moved to the driver side rear wall. We only placed cedar on about 70% of this wall as we were going to later install cabinets.

The last place to install the Cedar was above the sliding door, which was a bunch of trial and error, measuring and current curves and angles. But as always persistence paid off.

The last step of this process was to cut a few pieces of trim to cover up some imperfections where the walls met the ceiling. There you have it, the walls and ceiling were done and we could now move on to the cabinets and kitchen!

4 comments
Larry
Chad,
Thanks for the questions. On the side walls, we installed starting from the rear and bottom up as we had a flat edge to start on with the platform of the bed. I unfortunately don’t remember if the tongue faced up or down, but I would suggest just trying the first 2 without any glue or nails to get the process down. Moving from the bottom up, we nailed the lower section of the plank first leaving the upper with some play and then set the next plank and nailed the upper portion of the first plank and the lower section of the current plank. I hope this helps!!
Larry
Chad
Hi, great write up! I had a question for you regarding this part: “ To secure our cedar planks, we used liquid nails and a nail gun with a mix of 16ga and 18ga pin nails. TIP: Only nail the bottom side of the cedar plank your installing as it’s much easier to set the tongue and groove with the top of the lower board unsecured. Once the next board is set in place, nail the top of the previous board and the bottom of the current board. ”
Did you install from the bottom up or vice versa? Also, is the tongue facing up or down? Lastly, did you nail the tongue first prior to the next piece? Thanks in advance!
Larry
Rob,
Thanks for the comment! We have not had any issues with noise using the wood paneling. We secured the wood paneling using both nails and liquid nails. We also stopped the paneling just short of the end of the walls and ceiling end to avoid unwanted squeaks. We actually started using the cross nuts, but really struggled using the tool we purchased to install them. In the interest in time, we bailed on the cross nuts and went with self tappers. If you can use the cross nuts without trouble, I think that is certainly the way to go. The less additional holes you need to put in the van, the better!
Larry
Rob
Larry/Amanda,
Your page is fantastic and helps build on some of the missing pieces in other Van Builds. Thank you for taking the time to share with the rest of the world. When I talk to other Van Builders, they mention, to be mindful of wood paneling. They say it is incredibly noisy when driving. Do you find this to be the case? Did you do anything special to counteract the noise? I am also curious as to why you opted not to use cross nuts for securing everything and instead decided to use the self tapping screws?