Our original solution for water in the van utilized a marine faucet with a manual pump lever to pressurize and release the water. In addition to this getting annoying over time, we started getting leaks in the body of the faucet and decided it was time to step up our game in the water department.
Tools & Hardware
Shurflo 2.3 GPM 12v water pump - AmazonShurflo water strainer - Amazon
Drinking faucet, cold water only - Amazon
1/2" faucet supply hose - Local hardware store
1/2" quick release barbed male connector - Amazon
1/2" quick release barbed female connector - Amazon
1/2" OD food grade silicon tubing - Amazon
1/2" braided nylon tubing - local hardware store
3/4" to 1/2" barbed reducer - Amazon
Step drill bit - Amazon
12v rocker switch - Amazon
Paint sprayer inlet strainer - Amazon
7 gallon water container - Amazon (currently unavailable)
Drain tap with hose - Amazon
Hose clamps - local hardware store
The Install
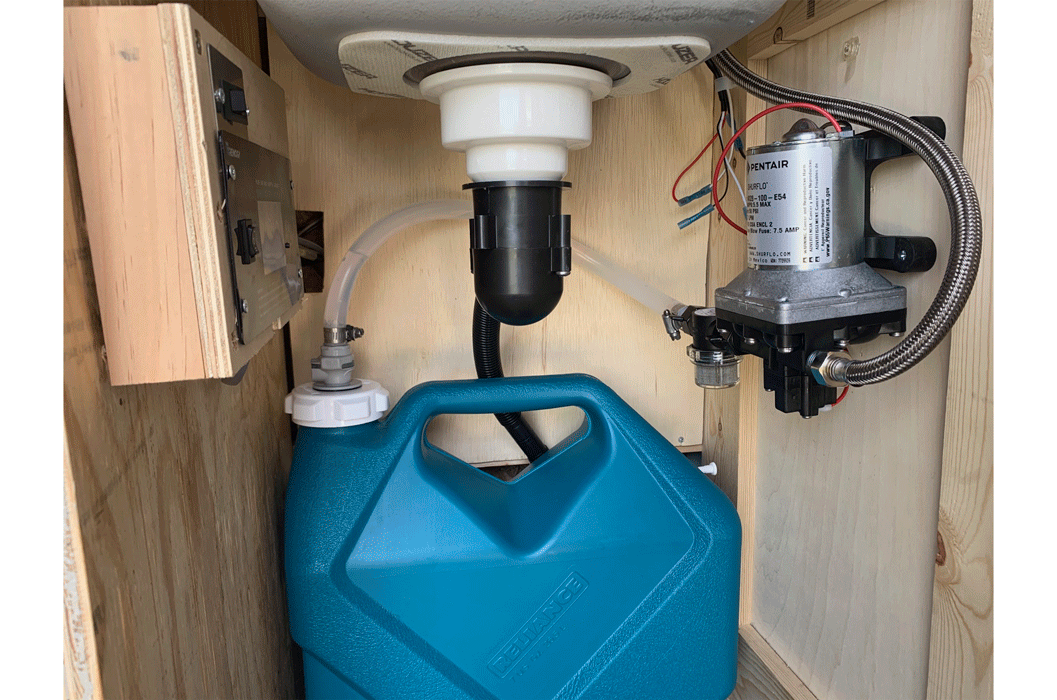
Our design is simple, water flows from our 7 gallon tank, through the water strainer and pump and then out of our faucet. Everything in this design is contained in the cabinet beneath our sink. Our water lines were intentionally kept short to make them easier to clear as we start getting freezing temperatures.
We started this install by using our step drill bit to expand the hole on the top of our 7 gallon water container to fit our female quick release connector. With the hole clean and complete, we secured the female quick release connector with the included nut. We then measured a length of hose to reach just before the bottom of the water tank, used scissors to cut and fastened the hose to the barb of the female quick release connector with a hose clamp. Now when we need to refill the tank, we can simply disconnect the water line to the pump without water spilling everywhere!
Next we moved to replacing our existing faucet with the new one. We quickly realized the the hole from the original faucet was slightly larger than the securing nut of the new faucet. We found a scrap piece of metal in the garage and drilled a 1" hole in it to create a surface for the nut to secure.

With the faucet in place and secure, we turned our attention to the water pump. We had already run the wiring for the pump from our fuse panel in anticipation of this need earlier on in our build. We added a 12v rocker switch for the water pump that we mounted directly behind the water faucet. We wanted a way to quickly disconnect power to the pump if something went wrong and only have power going to the pump when it was in use.

To do this, we ran the power wire from the fuse box to the power wire (red) on the switch, connected the accessory wire (white) on the switch to the power wire (red) of the pump and connected the ground directly from the fusebox to the water pump (black), leaving the ground alone on the switch. With the wiring complete, we added a 7.5 amp fuse and mounted the pump in our cabinet.

Now it was time to string this whole thing together using our 1/2" silicon tubing. We started by connecting the strainer directly to the water pump. Then we measured and cut a piece of silicon tubing to go from the water tank to the strainer. We secured our male quick release connector to one side of the tubing using a hose clamp. With the water tank in place, we connected the two quick releases and then secured the other end of the hose to the barb of the water strainer using a hose clamp. Next we attached our faucet supply line to the water pump and then to to our faucet. We used teflon tape on the faucet threads prior to securing the faucet supply line. Presto....running water!

In our prior design, we were using a grey water tank that took up a bunch of space and was minimally used. Most of our use of the sink is to fill containers for either drinking, cleaning dishes, etc. We decided to run the excess water directly out of the floor of the van. We drilled a 1" hole, using a hole saw, in the floor of the cabinet under the sink through the floor of the van. Make sure you are very certain where you are drilling to avoid putting a hole in something you shouldn't. We connected the drain tap and hose to the sink drain and then extended the hose using the 3/4" to 1/2" barbed reducer and 1/2" braided nylon tubing. We used this tubing as it much stronger and durable than the silicon and a portion of it will be exposed below the van. We ran the tubing out of our hole in the floor and then added the paint sprayer strainer to ensure only water was released below the van.


